

So, you’ve found some clay and you’re wondering now what?
Process

The first step is to process the clay. Clays can vary widely in quality and while some clays can be used straight out of the ground, that is fairly rare. Most wild/dug clays contain materials that need to be removed, such as sand, rocks, or organics and often need materials added.
Slake the clay in water to produce a slurry. Some clays will easily break down in water but some won’t. If your clay stays lumpy after several days in water, with stirring, try drying the clay completely before adding water. The completely dry clay acts like a sponge and sucks the water into the interior of the clay more readily than if some moisture is already present. A heavy duty drill and a paint mixing paddle can come in handy for stirring your slurry.
Now that you’ve got your clay in slurry form, is your clay sandy? The easiest way to remove sand is to have a really thin slurry and just let the sand fall to the bottom. You can then pour off the clay slurry on top. If your slurry is milk thin, the sand will fall out fairly fast (less than 10 minutes). Another advantage to having a thin slurry, is that it’s easier to get through the sieve. Start with a window screen and screen down progressively smaller. I generally sieve down to 100 microns. This removes even fairly small organic particles. You may not wish to sieve your clay this fine. You may not even want to remove the sand. It all depends on your clay and how you want to use it.
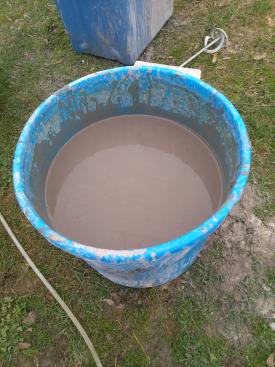
De-Water

Your clay is now clean. Let it settle in the bucket or tub for several days. If it doesn’t want to settle, you can add some vinegar or dissolved epsom salts. It will still take several days for it to settle but after it does, you can siphon the water off the top.
At this point it will still be fairly thin and needs to be dewatered. There are several ways to do this. You can pour the clay slurry into a pillowcase with a fine weave and let it drip, you can pour it into a plaster bowl or something similar, you can use a special dewatering apparatus, or you can simply leave it in the bucket and stir it every day. The last one may or may not work depending on your climate. If your clay is very fine particled, it may run right through a pillow case. If this happens, you will need to use plaster bowl or special de-watering apparatus.
Test
Once you’ve de-watered your clay to the point it’s workable, you need to make several small test items. When you fire, always put your test items inside another clay object with sufficient temperature resistance. Fire one of your items to bisque temps and see how it does. If it passes (most will), you have several choices. You can use your wild clay for low fire work or you can test it for Raku, in these cases firing higher isn’t necessary. You want to make functional or cone 6 or higher work? Just fire to your normal temperatures and see what happens (in a bowl!). If it melts or bloats, you need to fire lower. If it makes it through without bloating, slumping or melting, you can do an absorption test to see if it’s vitreous.
A body with a low absorption is important for microwave and dishwasher safe ceramics. A good rule of thumb is to keep the absorption under 2%. An absorption test requires boiling the object in water and then letting it set in the water for a total of 24 hours (boil+soak). The boiling time recommended varies according to the source. Digitalfire.com recommends a 5 hour boil, some other sources recommend 2, I have settled on a 3 hour boil and a 21 hr soak. The process is weight your unglazed ceramic test piece right from the kiln. Boil and soak then weigh again. Calculate the fired absorption with
absorption=(\cfrac{wetweight-dryweight}{dryweight})*100Making test bars and measuring the shrinkage is also a good idea. Visit Simple Shrinkage/Absorption Test for recommended procedures.
Adjust

You’ve tested your clay and it still has high absorption at the cone you normally fire? You will need to add flux to bring down the firing temperature. Some fluxes to consider are Nepheline syenite, feldspars, and frit 3110. How much you need will depend on your firing temperature and your individual clay. Test a bit and see how it works.
If your clay doesn’t fire as high as you’d like, you can add more refractory materials to raise the temperature. I have a wild clay that has 1% absorption at cone 02 (that is right 02). I’ve made a cone 6 body with this clay that is 55% of the cone 02 clay and 45% of a high fire silty clay. The resulting body has 1.5% absorption.
Other properties of your wild clay can be modified as well. Not plastic enough? Add bentonite or ball clay. If it cracks badly while drying, that could mean it is too plastic. Adding a less plastic material like silca or a kaolin may help. You can modify most properties of your clay by making additions.
In order to make glazes with your clay, more testing is required. A good place to start is 50 clay 50 wood ash or 50 clay 25 frit 3134 and 25 Neph sye. Not all clays will melt with these combinations but by doing some tests and modifying you can get some very nice glazes. Because of the high clay content, most will be prone to cracking while drying and crawling. This can be eliminated by calcining your clay and then grinding it up in a ball mill or with a mortar and pestle.
Working with wild clays can be very labor intensive but you can also get some amazing and unique results. If you would like additional reading, I highly recommend the Digital Fire website and this article It Starts with a Lump of Clay. There are also groups on various social media platforms that can help with questions.
Happy testing!